Ten minute tutorial
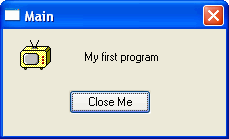
These steps teach you how to write a Windows Program that looks like this:
First you need Ubercode installed on your computer. If you don't have this, go to the Free Trial page and follow the instructions to install Ubercode. After
Ubercode is installed, it takes ten minutes (or even less!) to learn to write a program by
following steps 1 to 10 shown next.
Writing a program
-
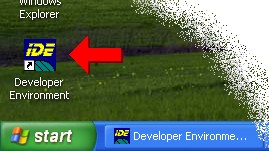
Start Ubercode by double-clicking the Developer Environment icon on the Windows desktop:
If you have purchased the Standard Pack or Professional Pack, you will be prompted to register
the software the first time it runs. Type in the user name and serial number from the registration
sticker on the back of the CD case, or from the registration details that were emailed to you. The
user name is not case sensitive, but the serial number must be entered exactly as shown in the
registration details. Registration does not connect to the internet.
-
When the Developer Environment starts, it will show the Startup Wizard. Click on "New Program",
then click OK. When the "New Program" window is shown, click OK to accept the default settings.
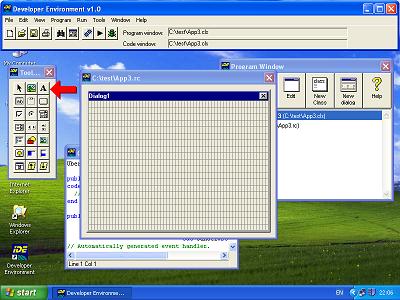
Your screen should now look like this:

The Program Window on the right shows all the files in the program. The window covered with the
grid is the Dialog editor for defining the layout of dialogs. The editor window (under the dialog
editor) has the program code in it - the code handles the events in a running program. The Toolbox
on the left shows control objects that can be dropped onto the dialog.
-
Now add the control objects to the dialog. In the toolbox, click the Label button, shown with
the red arrow in the diagram:
This drops a Label object onto the dialog. After dropping the label, drag it to the centre and
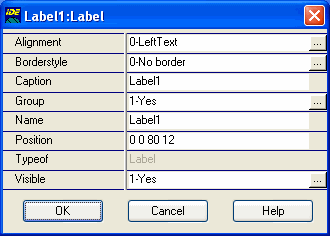
right-click it with the mouse to bring up the Label properties:
-
Change the Caption property to a short message, for example type in My first program.
After typing the text, click OK to close the Label Properties.
-
Now add the Pushbutton object. In the toolbox, click the Pushbutton object button (located
directly below the Label object button). This drops the pushbutton on the dialog. Drag it near the
bottom of the dialog, then right-click to bring up the Pushbutton properties:
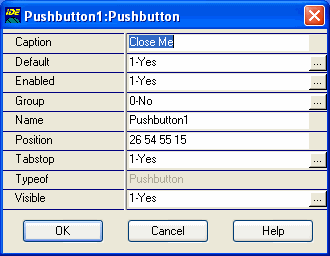
-
Change the Caption property to Close Me and the Default property to 1 (both shown above).
Then click OK to close the Pushbutton properties.
-
Now add the Icon object. In the toolbox, click the Icon object button, located to the left of
the Label. This drops the Icon onto the dialog. Drag it where you want, then right-click the object
to set the Icon properties. In the Icon properties, you can choose the picture. Click the small
button next to the Picture entry field, and browse until you find an interesting icon. There are
hundreds of icons in the c:\Program files \Ubercode \icons folder, and the one used here was
tv.ico. Click OK after choosing the icon.
-
Now write the code that makes the Close Me pushbutton unload the dialog and end the
program. Click the code window to activate it, and find the line of code that says:
case COMMAND_EVENT =>
Change it to read:
case COMMAND_EVENT =>
       if ControlObj = Me.Pushbutton1 then
         call Unload(Me)
       end if
This code says that whenever Pushbutton1 is pressed, the dialog is unloaded (closed).
-
Just to recap, we have a dialog called main, and the code window has a function called main that
detects the pushbutton in the dialog. The code detects the COMMAND_EVENT (triggered whenever a
Pushbutton is pressed) and uses it to unload the dialog. Although this example only has one dialog,
programs are allowed any number of dialogs, each with its own event function.
-
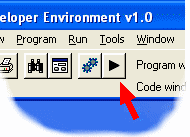
Now compile the program. Click the Run button (shown below) and wait a few moments. This
compiles the program to an EXE file and runs it:
When the program runs, you will see the dialog on the screen. It looks like this:
You have successfully written a program that works under all versions of Windows! Press the
"Close me" button to end the program - this triggers the Command event, which unloads the dialog
and ends the program because it has no windows left.
Common questions
-
The starter program doesn't do much - are there more examples?
All versions of Ubercode include over 250 example programs. Use "File - Open Example" in the
Developer Environment to see a list of sample programs, each one showing a common programming task.
In addition each language command has its own sample program. You can see this if you wrote the
starter program - click the mouse on the Unload command, then press the F1 key to read the help
page and the example. If you want to run the example program, click the "Example" button in the
help window, go back to the Developer Environment and use "Edit - Paste" to paste the example.
-
When is Ubercode available and how much does it cost?
Ubercode was released in mid-2005 and pricing is on the website at sales.html
-
Is there a quick guide to Ubercode?
Yes, refer to Learning to write Programs for
Windows.
-
Is there a list of benefits to using Ubercode?
Yes, refer to How to Write Software Using Ubercode for
a detailed list.
-
Where are the Technical Specifications for Ubercode?
Refer to Start Programming for details.
-
What is the reason for "yet another language"?
Ubercode helps computer literate non-programmers write their own software, and Ubercode EXE
files run under all versions of Windows (from 1995 on). It fills the niche that used to be filled
by Visual Basic, and before that Quickbasic under MS-DOS.
-
Is Ubercode complicated?
Ubercode is one of the easiest languages around. Refer to Learn Computer Programming - Which Language? for comparisons
between different computer languages. Ubercode is very practically oriented with over 250 tested
examples, clearly written help files, and detailed manuals.
-
What are the differences between Ubercode and other languages?
The key difference is Ubercode is designed to be very easy to use, whilst still being useful.
For more detail, see the Computer Language feature
matrix comparing Ubercode to other computer languages.
|