Learning Windows Programming - Control Objects
| Home page |
| What is Uberbot |
| What is Ubercode |
| Free trial |
| Ubercode store |
| Testimonials |
| Tech support |
| Forum |
| Links |
| News blog |
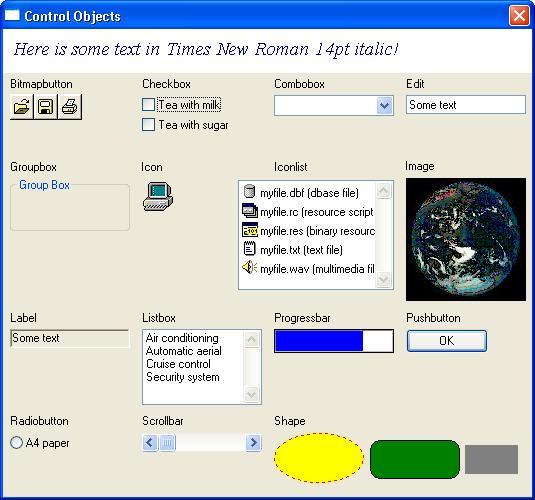
1. What control objects are available to a Windows program?Control Objects are used in Windows programs for interacting with the program's user. Control Objects include push buttons, entry fields for typing text, scrollbars, and many more. This screenshot shows different types of control object:
You create a program using control objects as follows:
After making a dialog with control objects, you can hook up the controls to their code. To see the code, go back to the dialog editor and double-click anywhere in the dialog. This takes you to the code that handles the events in the dialog. Refer to How do I make control objects run code for more details. 2. How do I make control objects run code?Control objects can have event handling code which is code that runs when the control is used. For example push buttons trigger the command event when they are clicked, so to make the push button run some code you go to the command event handler, add code to detect the particular push button, and then add the code you want to run. The quickest way to find the event handler is to bring up the dialog editor, double-click on it and the code editor will show the code for all the controls in the dialog. 3. How do I enable or disable a group of controls at run time?Use the ControlArray method to apply an action to a group of controls of the same type. You need to know the first control object in the group - this information is available when designing the dialog. At run time set up a loop through all the control objects in the array. Apply the action to each control in the loop by calling methods or properties on each control. The following example loops through one or more label objects. It gets the caption text of each label object and converts it to upper case:
  for i from Lbound(me.Label1) to Ubound(me.Label1)
    text <- GetCaption(ControlArray(me.Label1,i))
    call SetCaption(ControlArray(me.Label1,i), Strupper(text))
  end for
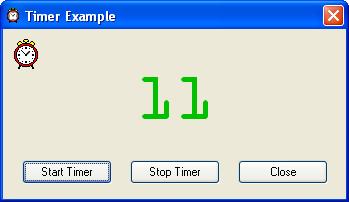
This technique is very versatile. It can be used to hide or make visible an array of controls, to copy information or get information from an array of controls, or to move controls, or to set checkboxes on or off, or to move controls. All the normal properties and methods are available to a control array. The only limit is the controls must be the same type, as this is the definition of a control array. 4. How do I make a multiline push button?The standard Windows push button object only allows one line of text, thus you have to use a Bitmapbutton object instead, and make a bitmap with the text. Use the Microsoft Paint program (or any equivalent bitmap editor) to make a bitmap with the desired text. Then add a Bitmapbutton object and use the newly created bitmap file as the button's picture property. 5. How do I set and test radio buttons?Each radio button has a read/write Value property. Set a radio button's value to 1 to set it, which automatically clears other radio buttons in the same group. Set a radio button's value to 0 to clear it. To see whether a button is pressed read the Value property. You can also use the Controlarray and Controlselection methods to easily find the selected radio button in a group. 6. How do I set up a timer?Timers are controls hosted by a window, and while active they repeatedly send Timer events to the window's event handler. A timer can be created by hosting any static control in a window (for example a label or an icon), calling SetTimer to start the timer and KillTimer to end the timer. While the timer is active, it triggers the Timer_Event. The next example creates a timer that counts seconds:
Here is the code for the example:
  // time2.rc
  // (needs "clock.ico" in the program's main folder)
  #define btnStart   101
  #define btnStop    102
  #define btnClose   103
  #define ID_TIMER   104
  #define lblSeconds 105

  Main_ID_TIMER ICON "clock.ico"

  Main DIALOG 274,135,229,105
  CAPTION "Timer Example"
  FONT 8,"Microsoft Sans Serif"
  STYLE WS_POPUP|WS_CAPTION|WS_SYSMENU|DS_CENTER|DS_MODALFRAME
  BEGIN
      ICON           "Main_ID_TIMER",ID_TIMER,5,5,21,20
      DEFPUSHBUTTON  "Start Timer",btnStart,13,81,60,15
      PUSHBUTTON     "Stop Timer",btnStop,85,81,60,15
      PUSHBUTTON     "Close",btnClose,157,81,60,15
      LTEXT          "",lblSeconds,160,8,56,12,WS_BORDER|NOT WS_VISIBLE
  END

  // time2.cls
  Ubercode 1 Class Time2

  public callback function main(in  EventId:integer
                                    ControlObj:control
                                    Key:integer
                                out Cancel:boolean)
  var
    fOK : boolean
    iOK : integer(0:MAXINT)
    iSeconds : integer(0:MAXINT)
  code
    select EventId

    case LOAD_EVENT =>
         // Set the font and colors used later on by Drawtext.
         // Note: if the font "OCR A Extended" is not installed, Windows defaults to "Arial".
         call Appicon("clock.ico")
         call SetFontName(Me, "OCR A Extended")
         call SetFontSize(Me, 48)
         call SetForecolour(Me, Rgb(0, 192, 0))
         call SetBackcolour(Me, GetSysColor(COLOR_BTNFACE))

    case COMMAND_EVENT =>
         if ControlObj = Me.btnStart then
           // Start button - Start the timer, blank out the old number and draw a "0".
           iOK <- SetTimer(Me, Me.ID_TIMER, 1000)
           call SetCaption(Me.lblSeconds, "0")
           call Drawshape(Me, SHAPE_RECTANGLE, BORDER_NONE,
                GetPagewidth(Me) div 4, GetPageheight(Me) div 4,
                3*GetPagewidth(Me) div 4, 3*GetPageheight(Me) div 4)
           call Drawtext(Me, "0", 0, 0, GetPagewidth(Me),
                Int(GetPageheight(Me)*0.8), DRAW_CENTRE)
         elseif ControlObj = Me.btnStop then
           // Stop button - Kill the timer.
           fOK <- KillTimer(Me, Me.ID_TIMER)
         elseif ControlObj = Me.btnClose then
           // Close button - Unload the window.
           call Unload(me)
         end if

    case TIMER_EVENT =>
         // Update the number of seconds and redraw the number.
         // call Sound(440, 0.1) // Enable for annoying beep!
         iSeconds <- StrToInt(GetCaption(me.lblSeconds)) + 1
         call SetCaption(Me.lblSeconds, Str(iSeconds))
         call Drawshape(Me, SHAPE_RECTANGLE, BORDER_NONE,
              GetPagewidth(Me) div 4, GetPageheight(Me) div 4,
              3*GetPagewidth(Me) div 4, 3*GetPageheight(Me) div 4)
         call Drawtext(Me, Str(iSeconds), 0, 0, GetPagewidth(Me),
              Int(GetPageheight(Me)*0.8), DRAW_CENTRE)

    case UNLOAD_EVENT =>
         // Unload() was called, or the Closebox button was clicked,
         // or Alt+F4 was pressed. When the window unloads, delete the timer.
         fOK <- KillTimer(Me, Me.ID_TIMER)

    end select
  end function

  end class
To make the example work, copy it to the clipboard, go into the Ubercode Developer Environment and use Edit - Paste. The Developer Environment prompts you to save the files, then you can run the example. 7. How much text can fit in a Label object?The limit is determined by Windows using the MAX_CAPTION constant (255 characters). Also note the text in the label will wrap downwards through the control by default, so if the label object is too small some of the text may wrap onto a second line which may not be visible. To fix this, either make the label object bigger, or set the Alignment property to 3 (LeftNoWordWrap) to suppress this behaviour. If you need to display more text than this, use an Edit object which allows an unlimited amount of text, up to the maximum size of a memory block. You can protect the text in the Edit object from being edited by setting its Disabled property equal to True. 8. Can the individual controls in a dialog have different fonts and colours?The Font properties apply to the entire dialog, not to the individual control objects. This is because the Font properties are stored in a Windows resource file (RC file), and this file format uses a single font which applies to the whole dialog. This means all controls in the dialog share the same font, which has the advantage that if you use the Windows control panel to change the default font and color scheme on your computer, the dialog is re-drawn using the new scheme. For example the following code tries to set the font of a control object, however the code will not work:
  case LOAD_EVENT =>
    call SetFontname(me.Label1, "Arial")
    call SetFontbold(me.Label1, True)
    ...
The code does not work because individual label objects lack a Fontname or Fontbold property, therefore a compiler error occurs when you call SetFontname using a control object. Instead SetFontname requires a Window or Printer object. If you want different fonts and colours in a dialog (and are prepared for your dialogs to ignore colour and font changes made from the Windows control panel), then use the graphics methods to draw the extra text. The example What are control objects and how do I use them? shows how to display text in a different font. |